
 Newbie Guide
 Video Guide
 Eudemons Profile
 FAQ
FAQ
Divine Lv.75 Instance
| Divine Level 90 Instance | Divine Level 85 Instance | Divine Level 80 Instance | Divine Level 75 Instance | Divine Level 70 Instance | Divine Level 60-65 Instance |
|
Quest Name |
Eclipsed Star |
|
Entrance |
Event→Recommended→Ancient Fire Tomb→3rd Floor→Eclipsed Star
|
|
Quest Time |
All Day |
|
Quest Rewards |
|
|
Servers Open for Quest |
All Servers |
|
Requirements to Participate |
Character level reaches 130, Divine Level reaches 75 |
|
Participation Count |
Can successfully challenge mysterious forbidden areas within Ancient Fire Tomb up to 2 times per day |
|
Quest Location |
Eclipsed Star |
|
Quest Key Items |
None |
|
Quest Key NPCs |
Name: Supervisor of Fire Tomb Gea
Name: Eclipsed Star Explorer·Cowles |
|
Brief Quest Guide |
|
|
1. Adventurer with Divine Level 75 or above can enter Eclipsed Star within Ancient Fire Tomb daily under the guidance of Supervisor of Fire Tomb Gea (242,483) in Cronus City .
|
|
|
Detailed Quest Guide |
|
|
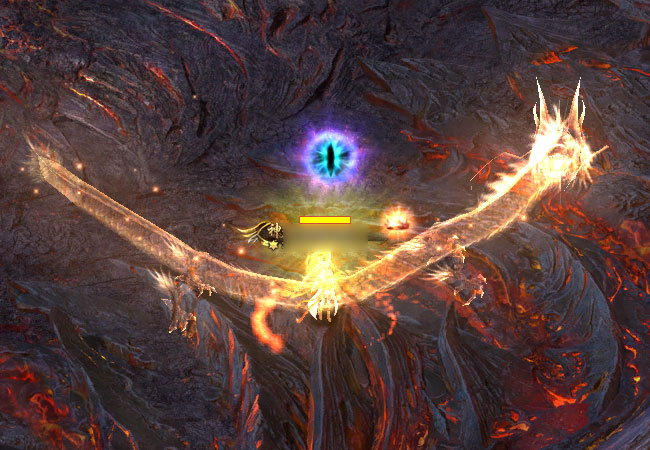
I. Eclipsed Star normal Difficulty Challenge Process 1. The Boss is divided into Left Arm, Right Arm, and Head. Lord`s Left Arm, Right Arm, and Main Body HP are independent and must be defeated one by one. In normal mode, if the Main Body is defeated first while the Left Arm and Right Arm remain intact, the Eclipsed Lord will gain significant damage reduction. Therefore, the Left Arm and Right Arm must be defeated first.
2. When the battle reaches 2 minutes and 4 minutes, the Eclipsed Lord will randomly devour 2 Hero into the Eclipsed Lord`s body. The devoured Hero must destroy the Dimstar Origin inside the Eclipsed Lord to regain freedom. The Dimstar Origin is protected by 6 surrounding Eclipsed Star Ward and is in an Invincible state. These Eclipsed Star Ward must all be destroyed to remove its Invincible state.
3. After the devoured Hero destroys the Dimstar Origin, they will return to the Battlefield, gain a 50% damage boost for 15 seconds, and inflict a Weak state on the Boss. Then, focus on defeating the Boss.
1. Left Arm (Two Skills) 1, Despair Strike A massive arm will sweep through the entire Alert area. Players hit will take damage and be stunned in place for 5 seconds. Tip: The system will give a warning. Leave the sweep area before the Attack lands to avoid it.
2, Meteor Fist The massive arm will continuously Attack the battlefield. Tip: This skill also has a system warning. Simply dodge normally; it will not Shadow affect output.
2. Right Arm (Two Skills) 1, Eclipsed Star Acolyte The Boss will summon Imp. After appearing, the Imp will randomly target 1 player. When the Imp gets close to a player, it will create 1 trap at the player`s current position. 5 seconds after the trap appears, it will cause AOE Damage. Tip: The targeted players should move collectively to the edges/corners of the map. After touching the Imp, a red circle will appear. Quickly move away and continue Attack ing the Boss.
2, Deliberate Bombardment Similar to the Left Arm`s sweep move, this action involves slamming the ground, followed by red Alert circles appearing sequentially at three random locations on the field. After the red circle Alert ends, area damage will occur at the corresponding location. This skill only requires normal dodging and is low difficulty.
3. Head (Four Skills) 1, Fiery Demon Star/Frost Demon Star Randomly targets 1 player, the targeted player will have a mark above their head. After 5 seconds, a 3-second red circle with Alert appears at their feet, dealing AOE Damage. This damage cycles between Fire and Frost (no damage is dealt in the first 2 seconds after the ice Fire Trap appears). Fire damage applies a 5-second DEBUFF to the player, causing them to lose HP per second. Frost damage deals a one-time HP damage to the player. Tip: Identify whether it`s Fire or Frost based on the blue or red orb above the head. After being marked, stay away from teammates and move to the edge of the map. Return to continue Attack ing the Boss after the red circle appears.
2, Scorching/Frost Ray and Death Glare Scorching/Frost Ray Every 30 seconds, the Boss releases an area Attack covering the front upper third area (central part of the arena only). The skill has an 8-second Alert period. Death Glare The Boss fires a horizontal ray Attack across the battlefield, either from left to right or right to left. There is a continuous 8-second Alert visual effect before the Attack. Tip: Similar to the Apocalypse Dragon's fire breath, just dodge to the other side.
3, Omen Cage and Soul Crush Randomly selects 1 player and teleport s them to a fixed location for imprisonment. The Boss 's left and right arms will then close in from both sides. If the arms reach the cage (16 seconds), each arm will deal 30% of the player's HP damage. The cage of the imprisoned player can be destroyed by Attack . If an arm is killed while approaching the cage, that arm dies. The trapped player is Dizziness ed until rescued or until the arms close, when the cage automatically disappears. Players trapped in the cage do not take damage from the eye beam Attack. Tip: Simply put, Focus Medium Heat to break the cage and save your teammate to prevent a wipe due to their death.
The above describes the skill mechanics of the Boss 's Left Arm, Right Arm, and Main Body in normal difficulty. Next, we introduce the skills and tactics for the Hero swallowed inside the Boss. I, Inside Eclipsed Lord Both Eclipsed Star Ward s on the left and right sides must be destroyed to unlock the central Boss.
There are 3 skill mechanics inside Eclipsed Lord Death Impact Released every 20 seconds, covering the lower body area except the Dimstar Origin/Eclipsed Star Ward zones (Alert 8 seconds). This skill directly deals damage to the player's Life. Tip: Simply dodge into the Eclipsed Star Ward zone.
Strike Fist and Dimstar Summon The Strike Fist appears at the left Eclipsed Star Ward. A giant left arm will appear randomly at one of the 3 left Eclipsed Star Ward zones and perform an Attack.
Dimstar Summon The right hand spawns 1 Imp at a fixed spot in the right Eclipsed Star Ward zone (1 at each of the 3 positions). After appearing, a 5x5 red Circle Warning visual effect (15-second Alert) plays directly on the Imp. After the Alert ends, the Imp Self-explosion s, damaging players in the area and causing Dizziness for 3 seconds.
Tip: Not difficult, just DPS from outside the circle. When Death Impact is cast, you can DPS at the location marked by the arrow in the image.
Additionally, if not destroyed within approximately 2 minutes, a fire Trap will appear, increasing the difficulty.
The Ward monsters have low HP, suggesting splitting up to attack them. After killing one, a speed boost is gained, allowing players to move faster to the next Ward. Also, after being destroyed, they turn into golden lines, allowing teammates to identify if it`s destroyed. Once all Ward s are destroyed, the Boss is unlocked. The Boss has 0 HP and dies in one hit.
After defeating the powerful Eclipsed Lord, the True Form of Eclipsed Lord appears.
Finally, don't forget to claim your rewards.
|
|




|
Quest Name |
Star Palace |
|
Entrance |
Activity→Recommended→Ancient Fire Tomb→3rd Floor→Star Palace
|
|
Quest Rewards |
In addition to the above rewards, players can also obtain a large amount of Star Point, various Class Star Source Crystals, and other rewards. |
|
Servers Open for the Quest |
All Servers |
|
Quest Requirements |
Character Level 130, Divine Level 75 |
|
Participation Count |
Can successfully challenge the mysterious forbidden area within Ancient Fire Tomb twice daily. |
|
Quest Location |
Star Palace |
|
Key Quest NPCs |
Name: Supervisor of Fire Tomb Gea
Name: Star Spirit Monitor·Galil |
|
Brief Quest Guide |
|
|
1. Adventurers who have reached Character Level 130 and Divine Level 75 can enter the mysterious forbidden zone within the Ancient Fire Tomb-the Star Palace-daily, guided by Supervisor of Fire Tomb Gea (242,483) in Cronus City.
|
|
|
Detailed Mission Guide |
|
|
Upon reaching the core area of the Star Palace, players will encounter the Fallen Stargod. Initiating dialogue starts the battle.
The Fallen Stargod wields twin swords, and its deadly Luck fills the Star Palace with peril. Players must constantly observe their surroundings and move cautiously to dodge its relentless killing moves!
I. Ethereal Sword Remnant · Lunar Light The Boss releases a thrust attack centered on itself, targeting one random direction among Left Flank/top right, left/bottom right. The thrust will Attack all players within range, causing damage. It leaves a fissure along the edge of the space it traverses. Move out of the Attack path promptly to avoid damage.
II. Ethereal Sword Remnant · Sunshine The Boss releases a slashing attack centered on itself, targeting one random direction among the remaining three directions (excluding the thrust direction). The slash creates three sword waves, leaving 3 fissures at the map edges. This skill is easy to dodge by moving to the side Safe Zones. A small tip: Chain Class skills by utilizing the circled rocks in the diagram.
III. Fallen Star Combo Slash The Boss Energy Focuses towards a SpaceRift direction for 10 seconds, then fires a Luck in that direction. The Luck travels through fissures and is emitted from other fissures. This skill requires team coordination: focus damage to shatter 1 space fissure and create a safe zone. Do not split damage (except for experts) to avoid insufficient DPS, failing to shatter the fissure and causing a wipe. Being Attacked reduces character HP by half. Additionally, note that SpaceRifts marked with arrows cannot be shattered. There are two types of fissure space deployments: 1. Focus on shattering one space fissure to create a Safe Zone. The one circled in red in the diagram must be destroyed together. Destroying it prevents Luck emission. 2. The other type does not require shattering (it has a built-in Safe Zone) and allows free DPS. Tip: Agree beforehand to follow the party leader or teammates and focus fire together.
2. In this situation, focusing to shatter the SpaceRift is unnecessary. It has a built-in Safe Zone. False space fissures circled in green have yellow arrows; the Luck they emit will not pass through the Boss.
3. Failure to destroy it in time causes Luck emission, leaving nowhere to hide and reducing character HP by half.
The following skills appear in Hard and Hell modes: IV. Galaxy Shatter The Boss releases a Berserker Strike centered on itself, targeting one random direction among Left Flank/top right, left/bottom right. In Hard Mode, when the slash hits a space wall, it ricochets randomly horizontally/vertically, damaging areas it passes over. Upon hitting space again, it generates two SpaceRifts. In Hell Difficulty, when the slash hits a space wall, it ricochets fixedly horizontally and vertically, damaging areas it passes over. Upon hitting space again, it generates four SpaceRifts.
IV. Psychic Confinement The Boss releases psychic energy, forcibly grabbing one player and confining them at a random position among Left Flank/top right, left/bottom right of the Boss. After a period, if the player does not Struggle free, the Boss will release a Galaxy Shatter towards the confined player. Focus Medium Heat efforts to rescue teammates to prevent Galaxy Shatter and additional fissures.
|
|


|
Mission Name |
Murk Field |
|
Entrance |
Events→Recommend→Ancient Fire Tomb→3rd Floor→Murk Field
|
|
Mission Rewards |
In addition to the above rewards, you can also obtain large amounts of Star Points and rewards like Stellar Source Crystals for each Class. |
|
Servers Open for the Mission |
All Servers |
|
Requirements to Participate |
Character Level reaches 130, Divine Level reaches 75 |
|
Participation Count |
Can successfully challenge the mysterious forbidden zone within the Ancient Fire Tomb 2 times per day |
|
Mission Location |
Murk Field |
|
Key Mission NPCs |
Name: Supervisor of Fire Tomb Gea
Name: Star Imp Researcher·Kyle |
|
Brief Mission Guide |
|
|
1, Characters who reach Level 130 and Divine Level 75 can enter the mysterious forbidden zone within Ancient Fire Tomb-Murk Field-daily under the guidance of Gea Supervisor of Fire Tomb in Cronus City §__PLACEHOLDER_113__§(242,483).
|
|
|
Detailed Mission Guide |
|
|
I. Star Imp. Rage: This Boss will randomly shoot delayed flames in 2-3 out of four directions. An Alert indicator appears before firing. Simply dodge to a direction without flames. Additionally, this skill primarily deducts Eudemon HP, so Shield-type skills can block the damage once.
II. Star Imp. Malice: This Boss randomly spawns Pillar on the map, connecting to player characters. Higher difficulty spawns more Pillar. Players must quickly move away from nearby Pillar to break the connection; or, move away from the Pillar spawn area before the Boss releases the skill to avoid being connected. This skill also deducts Eudemon HP. Shield skills can mitigate it briefly, but it deals damage over time. Breaking the connection is best, or the Eudemon may die.
III. Star Imp. Dark Shadow The Boss randomly marks player characters with Light Mark or Dark Mark. Players with Light Mark must contact teammates with Dark Mark to remove it. Players with Dark Mark must contact those with Light Mark. Removing marks grants a damage-boosting BUFF. When the Boss activates the skill, an on-screen Admiral prompt tells players which teammate to contact. After seeing the prompt, players must quickly approach and contact the designated teammate. For safety, it is advised that all players group up before the skill triggers. If marks aren’t removed within 10 seconds, a full-screen explosion occurs, deducting all players’ character HP. This explosion deals extremely high damage; usually two hits cause a wipe. This skill is the primary cause of failure in Murk Field and requires priority handling.
IV. Star Imp. Greed The Boss spawns tentacles on the left and right sides of the map to grab player characters. normal grabs one player; Hard and Hell grab two. When grabbing two, tentacle positions are fixed on left and right. Grabbed players lose character HP continuously and must be rescued by quickly destroying the tentacles. Destroying a tentacle also grants a damage-boosting BUFF. If tentacles aren’t defeated promptly, the Boss targets a player’s location to Strike the ground, creating a red warning circle. Players must immediately avoid the red circle or lose significant character HP. If a player grabbed by a tentacle is also hit by this red circle, they die instantly.
Note: Every 1 minute, a new Star Imp appears at the center of the Battlefield. If all Star Imp aren’t eliminated within 6 minutes, the entire Murk Field will be doomed.
V. Hard Final Boss 1, Ancient Star Imp appears only in Hard and Hell modes.
2, In Hard mode, the Boss randomly absorbs the power of two Knights: It then uses one Knight’s skill, while the other Knight’s phantom Shadow patrols the perimeter. Handle this phase using the original mechanics for defeating that Knight, but note two points: First, the absorption tether between Boss and Knight deals continuous damage-avoid the tether path. Second, during Absorb, the Boss spawns multiple small red circles under all players’ feet in sequence-keep moving to dodge, or getting hit causes massive character HP loss. 3, In Hell mode, the Boss randomly Absorb three Knights’ power, simultaneously using two Knights’ skills, while the 3rd Place Knight’s phantom Shadow patrols the perimeter. As in Hard mode, dodge the tether between Boss and Knights during Absorb, and the rotating AoE red circles under players’ feet. The main challenge is that the Boss activates two Knight skills simultaneously; some combinations may interfere or create chain threats, requiring close team coordination and flexible response. In Hell mode, the battle rhythm can easily become chaotic due to the Boss using two skills at once. The team should prioritize handling lethal skills like the Dark Shadow Knight’s full-screen explosion. Maintain orderly movement during mechanics like tethers to avoid scattering and failing to remove marks in time. As long as mechanics are executed steadily, deaths are avoided, and an average DPS of around 300 million is maintained, clearing is achievable. 4, The easiest combination is when the Boss uses "Greed" paired with any other Knight skill. Since "Greed" deals low damage, it can usually be tanked once or twice. The team only needs to focus on handling the other Knight’s skill mechanics, resulting in lower pressure.
When Boss uses the combinations of "Malice + Dark Shadow", "Malice + Greed", or "Greed + Dark Shadow", the handling priority is as follows:
|
|


